


Guide: Adding Proton VPN with WireGuard to pfSense
Cooler than a client, and wicked fast.


Table of contents
One of the driving factors for upgrading my home network has been to test if I could route all of my home traffic through a VPN. While a VPN agent is easy to install on any client such as my desktop or phone, I've heard about leaks and wanted to see how difficult it would be to just funnel all of my home traffic through one.
Objectives:
- Setup a Wireguard VPN tunnel for all home internet traffic via pfSense
- Use WireGuard vs OpenVPN to keep speeds high and CPU usage low
- Create a kill switch which blocks all traffic should the VPN go down
- Learn something new about pfSense, and test if Proton VPN is fast and reliable
Reasoning:
As I started to compare potential hardware for a new firewall, I was struck by this chart showing performance results of different Protectli products:
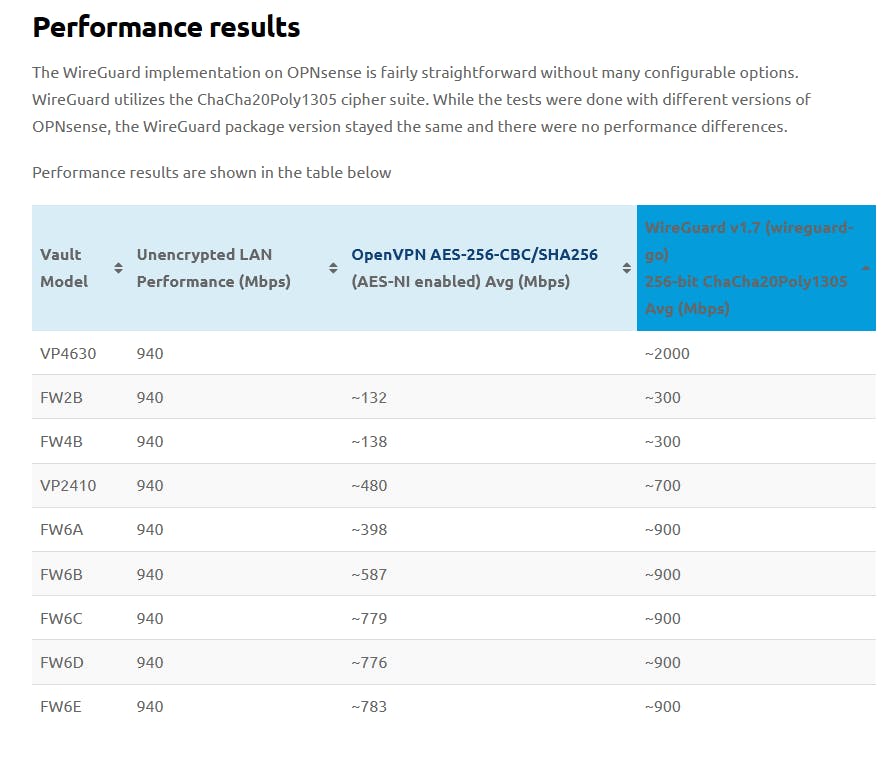
Obviously Wireguard looks to be leaps faster while requiring less CPU to encrypt and decrypt traffic. In another post I'll discuss the specific hardware I purchased for my home router, but this chart seemed to indicate that I could probably get away with cheaper hardware without sacrificing much bandwidth.
Problem:
Outside of using a largely auto-configuring downloadable client, I haven't personally setup any VPN tunnels. I quickly grew frustrated finding little documentation or videos online demonstrating how to set this up. There are many describing the process for OpenVPN (including Proton's own guide here), but very few for Wireguard.
Solution:
A combination of the following videos and documentation has led me to these steps:
- Proton VPN pfSense documentation (Only shows OpenVPN process)
- IVPN pfSense WireGuard Setup Guide
- Video by NetworkChuck:
- Video by Christian McDonald:
Steps:
Backup pfSense
- Follow the instructions here
Get the WireGuard configuration:
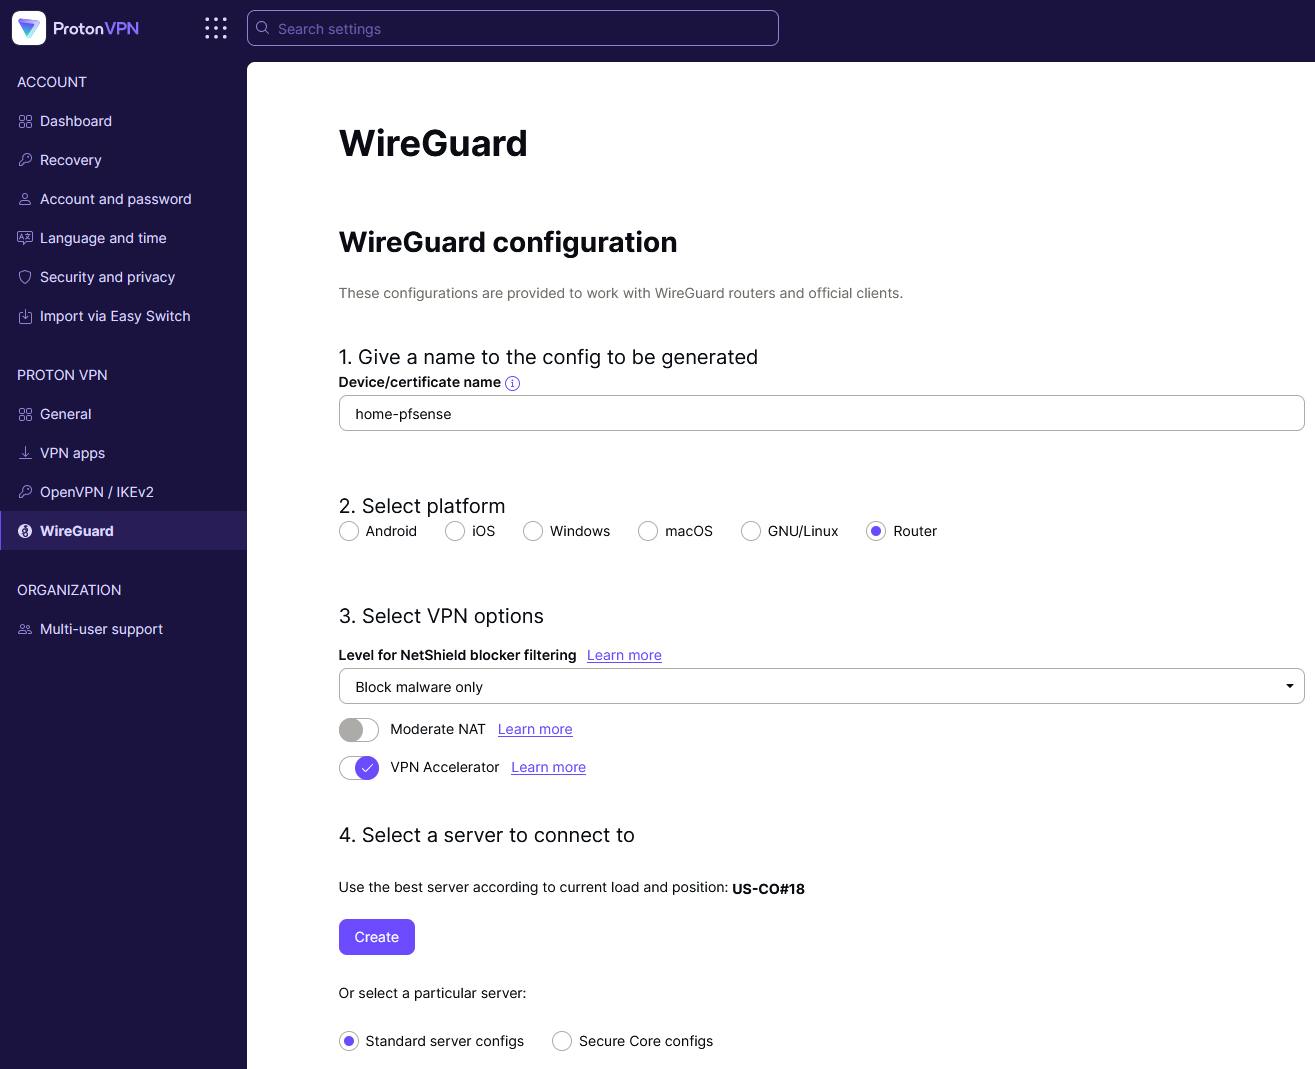
Go to Proton VPN and select 'WireGuard' on the left
- Name the configuration. E.g. 'home-pfsense'
- Select 'Router'
- Select VPN options. I leave it to the default - Block Malware, and VPN accelerator on
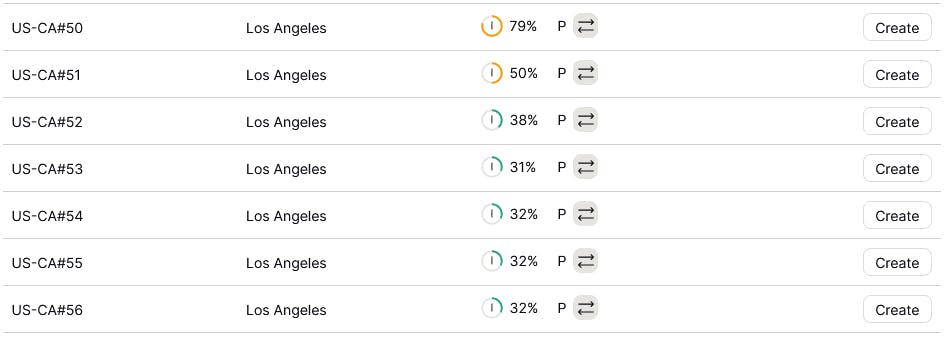
Choose your server. For this example, I'm using US-CA#56
- note: The P = paid server (not ProtonVPN free), and the arrows indicate it's capable of p2p
- note: The P = paid server (not ProtonVPN free), and the arrows indicate it's capable of p2p
- Click 'Create'. You may now either copy the text or download a .conf file with it
- Note: ProtonVPN elects to give you both Private and Public keys. If your WireGuard VPN provider only gives you the Private key, then you would generate your own key pairs within pfSense and upload your Public key to the VPN provider.

- Note: ProtonVPN elects to give you both Private and Public keys. If your WireGuard VPN provider only gives you the Private key, then you would generate your own key pairs within pfSense and upload your Public key to the VPN provider.
Configure WireGuard on pfSense:
- Install:
- Go to System > Package Manager > Available Packages
- Search for 'WireGuard' and click Install
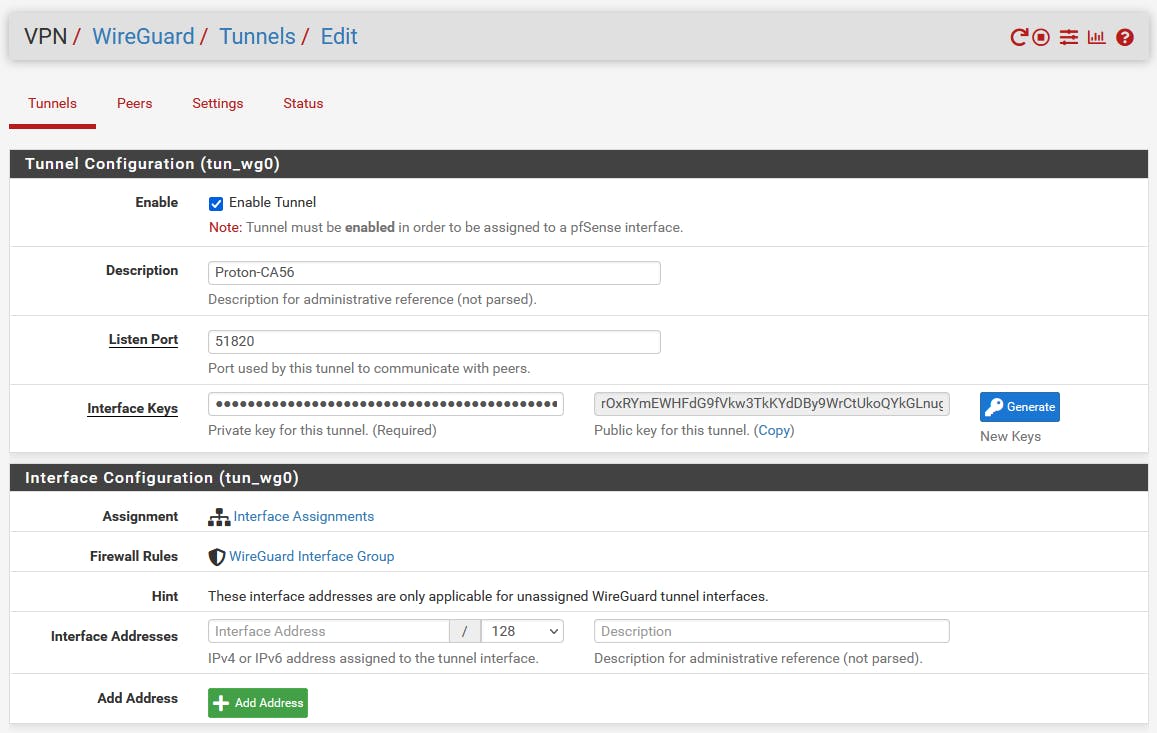
- Create the tunnel:
- Go to VPN > WireGuard, click the green '+Add Tunnel' button
- Enable: Selected
- Description: e.g. Proton-CA56
- Listen Port: 51820
- Interface Keys: Paste the Private Key which you were given in the .conf file
- Click blue 'Save Tunnel' button
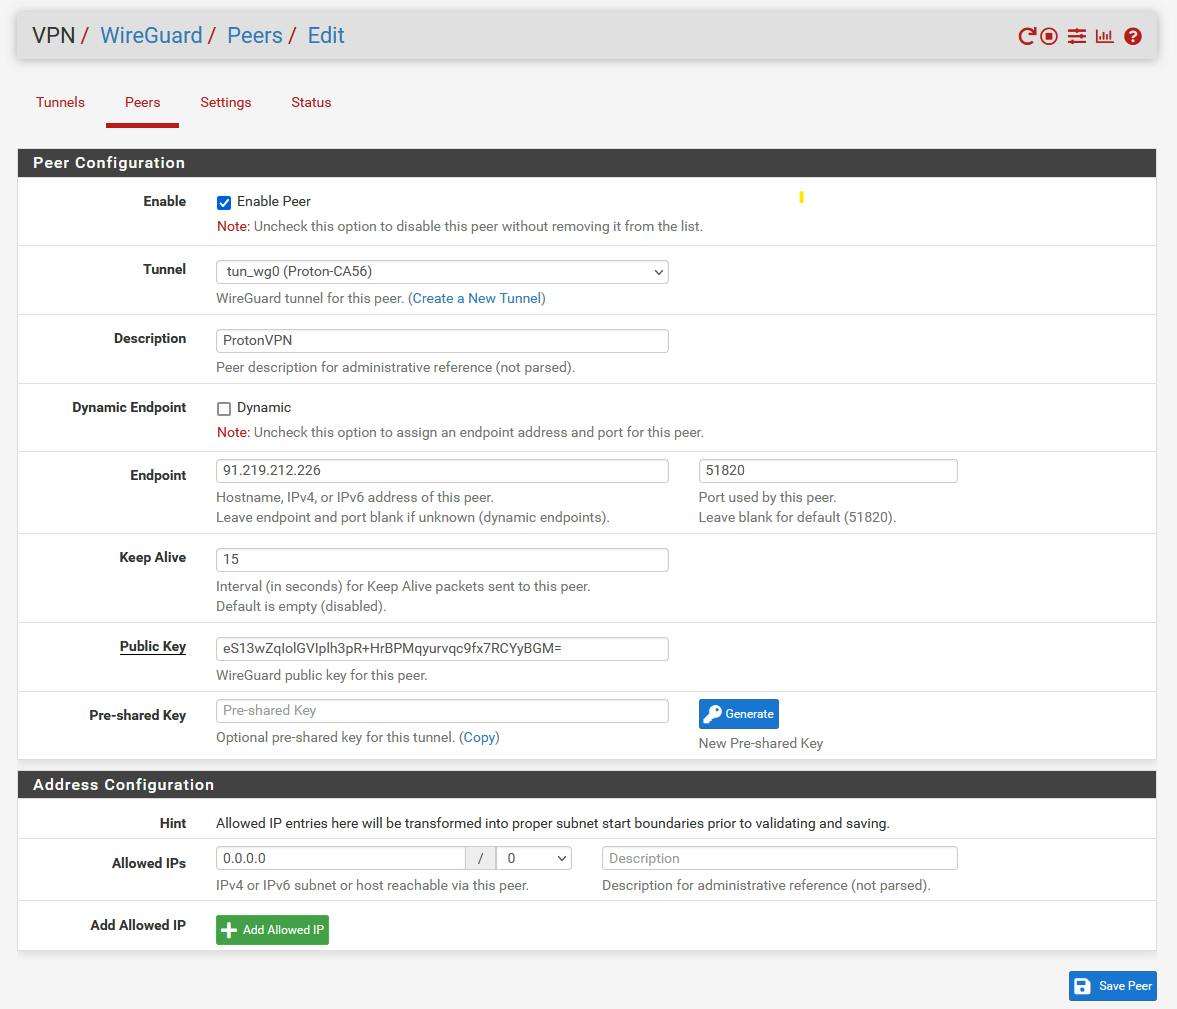
- Create the peer:
- Click 'Peers' at the top, then the green '+Add Peer' button
- Enable: Selected
- Tunnel: Select the one you just created 'tun_wg0 (Proton-CA56)'
- Description: e.g. Proton VPN
- Dynamic Endpoint: Uncheck
- Endpoint: Enter the IPv4 address and port from your .conf file
- Keep Alive: 15
- Public Key: Paste the public key from your .config
- Pre-shared Key: leave blank
- Address Config: Allowed IPs: 0.0.0.0 / 0, Name: Allow all IPv4
- This enables the entire IPv4 address space to be used
- If you'd like to allow IPv6 traffic, then click +Add Allowed IP, type '::' for address range, /0, and name it 'Allow all IPv6'. The '::' is just telling it to use the IP range you defined above in IPv4, which is 0.0.0.0
- Save
- Start WireGuard:
- Go to Settings, check Enable WireGuard, Click Save

- Go to Status, look for a green up arrow:
 SUCCESS! - The tunnel between your pfSense router and the WireGuard endpoint is up! Now we can continue by adding this to an interface, routing all traffic through that, and creating a kill switch, and finally testing everything.
- Go to Settings, check Enable WireGuard, Click Save
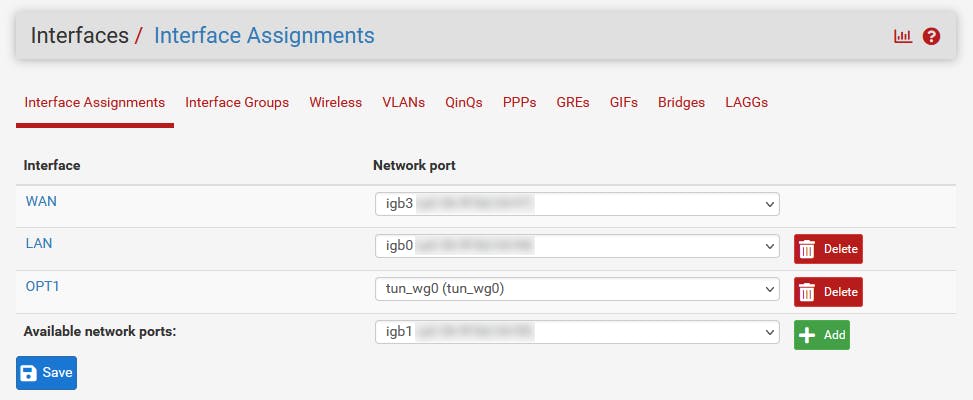
Interface & Gateway:
- Go to Interfaces > Assignments
- Available network ports: Select the newly created WireGuard tunnel: tun_wg0, click +Add
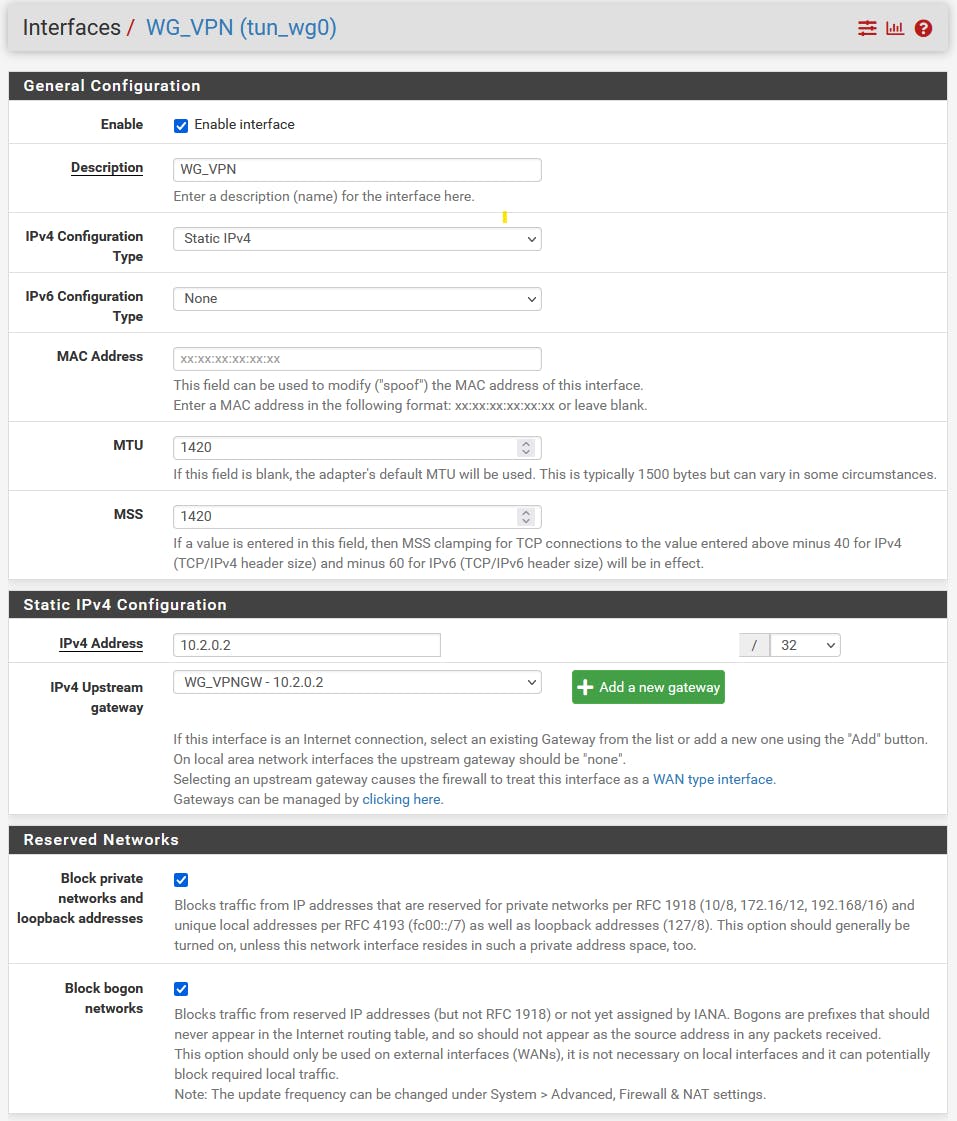
- Click on the name of the newly added interface (Default is OPT1)
- Enable: Select enable interface
- Description: Rename from OPT1 to something like 'WG_VPN'
- IPv4 Configuration Type: Static IPv4
- IPv6 Configuration Type: None
- MAC Address: leave blank
- MTU: 1420
- Maximum Transmission Unit: Because of WireGuard's overhead, you want to set it for 1420
- MSS: 1420
- Maximum Segment Size: You want this clamped to 1380, but it's calculated minus 40 (for 40 bytes of v4 header) from whatever you type here. So you want to enter 1420 (1420-40=1380)
- Static IPv4 Configuration
- IPv4 Address: Enter the address shown in the .conf file. In my case, it was 10.2.0.2
- IPv4 Upstream gateway:
- Click +Add a new gateway
- Enter the same IPv4 address (e.g. 10.2.0.2)
- Description: e.g. Interface Proton_WG_VPNV4 Gateway
- Click +Add
- Note: If you have a IPv6 configuration, then select Static IPv6 from the dropdown and configure similarly, using /128 for the address space, and adding an IPv6 gateway
- Block private networks and loopback addresses: Select
- Block bogon networks: Select
- Click Save at the bottom, then Apply Changes at the top
- Go to System > Routing
- Find your new WireGuard gateway, click the pencil icon on the right to edit it
- Monitor IP: Change to 1.1.1.1, click Save, then Apply Changes at top
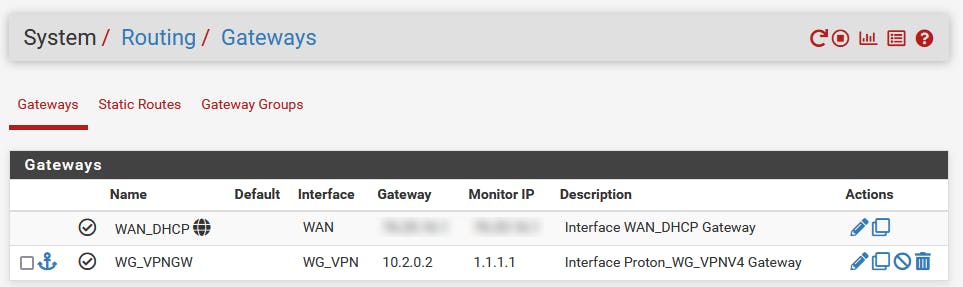
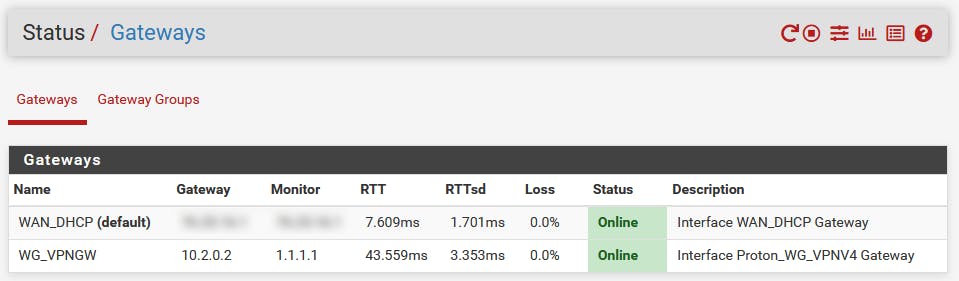
- Go to Status > Gateways, you should see both your WAN and WireGuard VPN as showing 'Online'
Network Address Translation:
- Go to Firewall > NAT > Outbound
- Outbound NAT Mode: Change to Manual Outbound NAT rule generation, click Save & Apply Changes
- Mappings: Click Add
- Interface: Select 'WG_VPN' or whatever you named your new Interface
- Source: Network, enter your network (e.g. 192.168.0.0) / 24
- Click Save (don't click apply settings yet)
- Click the little duplication icon next to your new mapping 'Add a new mapping based on this one'
- Source: Network, change this to 127.0.0.0/8
- Click Save
- Click Apply Settings. Wait for the page to reload, or manually reload it. Many new auto-generated mappings should now show up.
- Select any with WAN as the interface and Your local network as the Source, and DELETE these. This will prevent VPN leakage if the tunnel goes down. Click Save and Apply Changes.
(Example: Delete the two highlighted)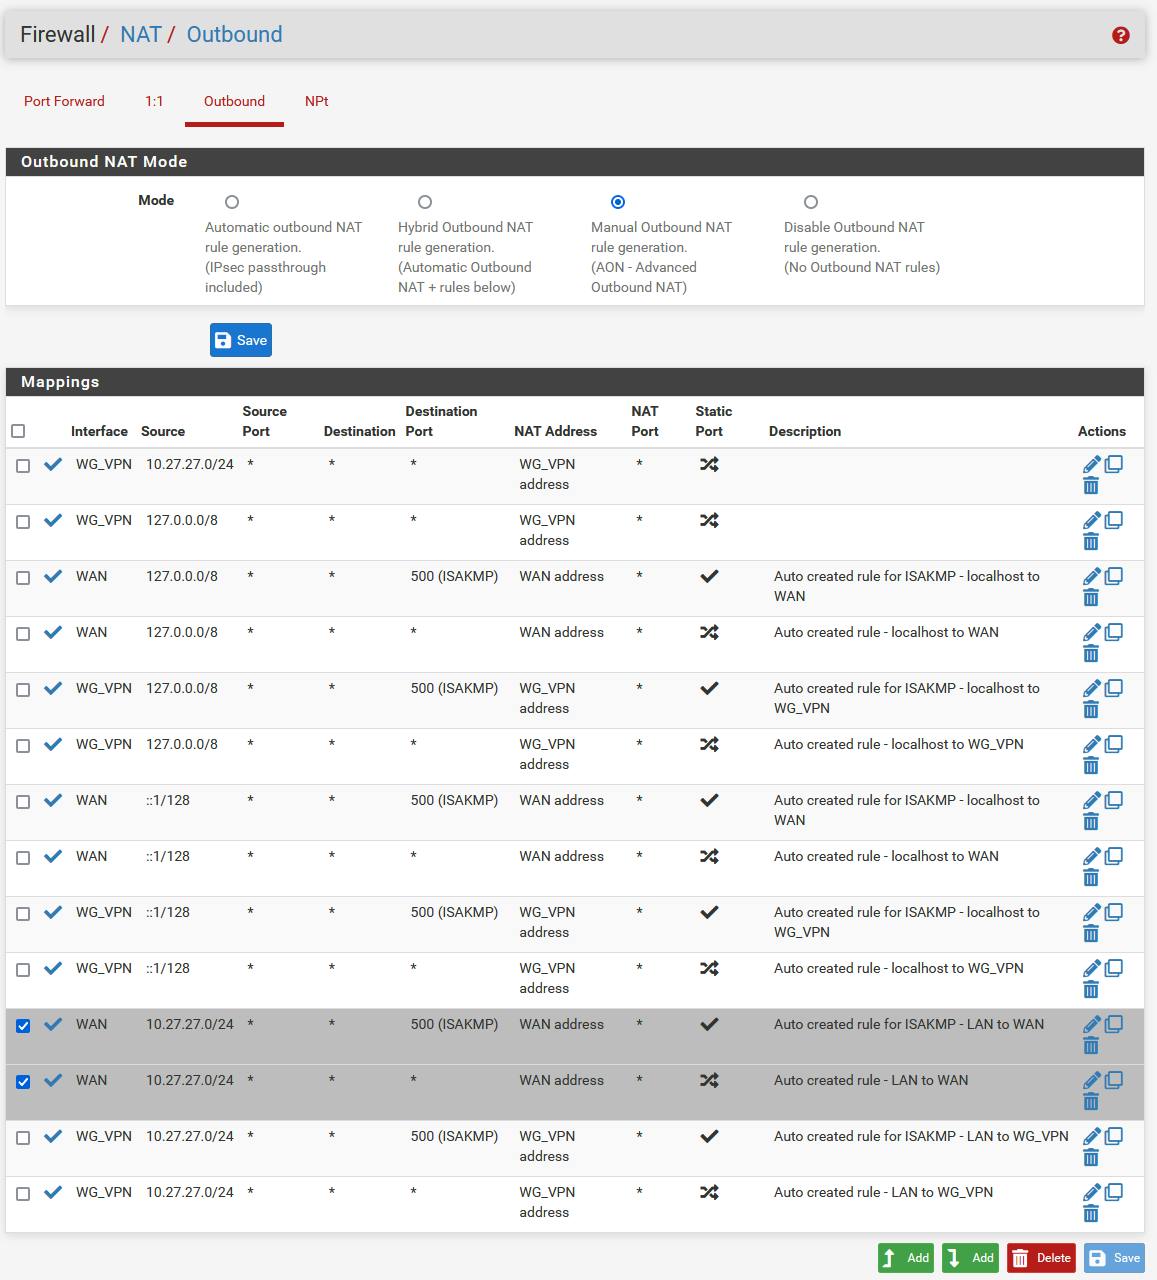
Aliases:
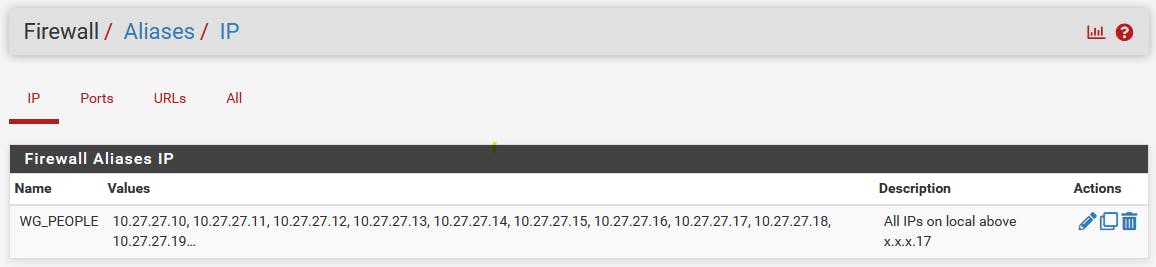
- Go to Firewall > Aliases > IP
- Click +Add
- Name: e.g. WG_PEOPLE
- Type: Host(s)
- Host(s): The IP range on your network you'd like to have all traffic sent through the VPN. I'm going to give it my entire DHCP and statically assigned range: 10.27.27.17-10.27.27.255
- Click Save, and Apply Changes
Policy Based Routing:
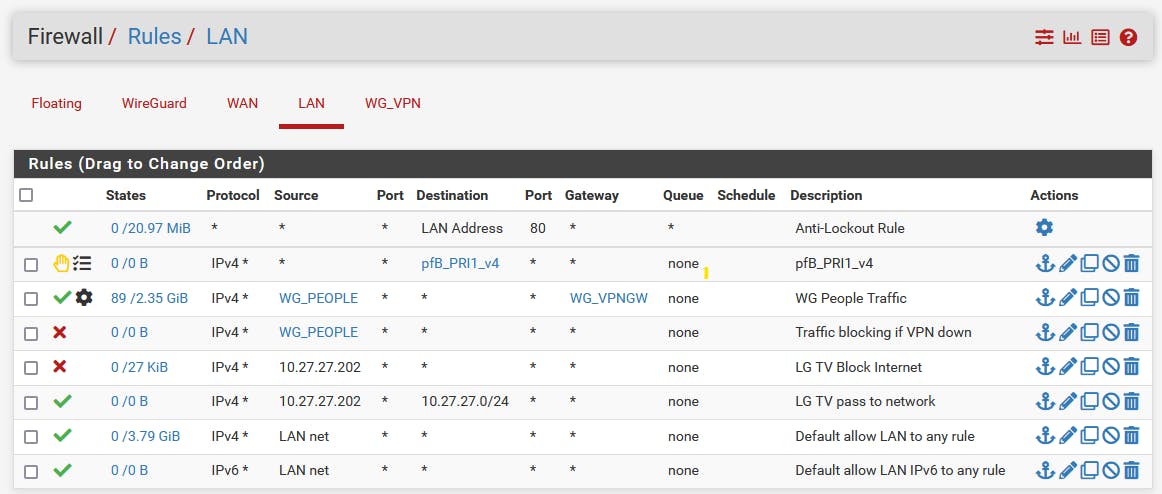
- Go to Firewall > Rules > LAN
- Click Add
- Protocol: Any
- Source: Single host or alias, then select the Alias group you created earlier: WG_PEOPLE
- Alt: You can also select LAN net to select your entire LAN network, rather than the group you created. I just want a subset of my LAN network, so I'm using the Alias
- Click Advanced:
- Gateway: Select your WireGuard Gateway
- Click Save
- Click Add rule
- Action: Block
- Protocol: Any
- Source: Single host or alias, select your Alias group again, or LAN network for all
- Description: e.g. Traffic blocking if VPN down
- Reorder the rules:
- Move your newly created Pass rule to above your block rule. The rules work from the top down.
- Click Save at bottom, and Apply Changes
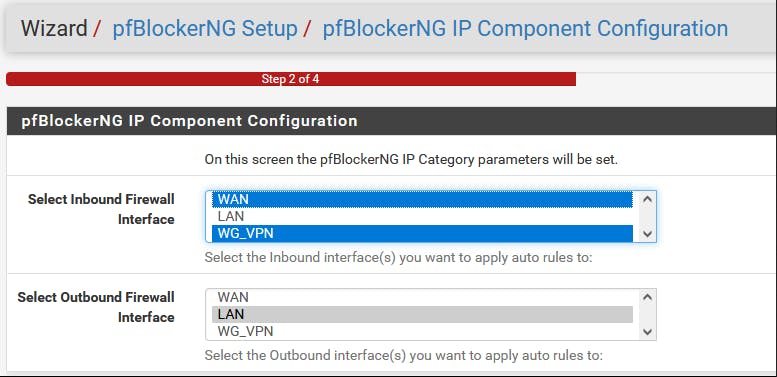
About pfBlocker:
If you have pfBlockerNG running, you'll need re-run the setup wizard, selecting both the WAN and VPN as inbound interfaces. Only after re-running it will you start seeing a new public-facing IP through the VPN.
Testing:
New IP
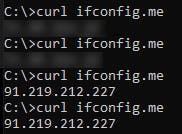
Check your IP before and after configuration:
curl ifconfig.me
VPN Kill Switch
- Open a command prompt or terminal. Start a continuous ping to 1.1.1.1
- Go to VPN > WireGuard > Peers
- Click Edit
- Uncheck 'Enable Peer'
- Click Save Peer
- Click Apply Changes
By flipping the WireGuard peer state between enabled and disabled, we can watch the tunnel go down in real time. If all is configured correctly, then we should immediately see our ping fail.
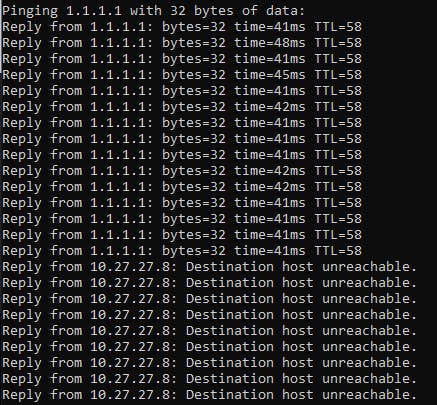
If however there is a misconfiguration somewhere, it may leak around the rules we created and we'll see our IP revert. I've seen this happen when I mistakenly had selected 'Hybrid Outbound NAT' instead of 'Manual Outbound Nat' under Firewall > NAT > Outbound.
Changing the Endpoint:
- Select a new server and download the .conf file using the steps described above
- VPN > WireGuard >Tunnels:
- Edit the tunnel
- Update the name with your new server location
- Paste in the new Private Key
- Click Save Tunnel, and Apply Settings
- Edit the Peer:
- Paste in the new Endpoint address
- Paste in the new Public Key
- Click Save Peer, and Apply Settings
Speed:
I consider the overall speed to be great. Downloads are about 80% of their un-VPN'd speed, and uploads are about 95%. Obviously endpoint geographic location will make an impact on your ping.
Before: 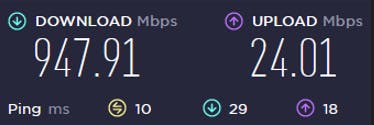 Endpoint ~70mi away:
 Endpoint ~950mi away:
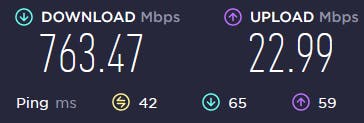
Final Thoughts:
- I've had this setup running for about 45 days now and it's been (mostly) great. There are a few annoyances such as certain websites giving you the boot (Looking at you SoundCloud), but overall speed and reliability has been superb.
- Gaming with a local-ish endpoint has been no issue. I'm no e-sports maniac, but I do a lot of social VR stuff and have observed no noticeable difference.
- If there are slowdowns, I'm curious how someone might figure out if it's a problem of the VPN or the ISP. My best guess might be to take continuous measurements across them both and if the delta increases, then we know it's an issue with the VPN.
- VPN providers push marketing material hard to make it seem like you -have- to use one if you want any privacy at all. I think Tom Scott gives an excellent explanation of this, and why VPNs can be OK, but they're not absolutely necessary for everyday home usage like this. I was just curious if I could do it and learn something about networking and pfSense along the way.
- One important point he raises is that it's virtually impossible to know if your endpoint is being logged and/or tapped.
- I'm curious if it's possible to nest-tunnels from within pfSense. I may have to experiment with this.
- I'm kind of a noob and learning as I go along. If you see an opportunity for improvement, or any incorrect info within this, please reach out. Thank you.